|
Posted on .
Let's Make Some Wine!
When I was in my teens, I watched a documentary on how prisoners made
'hooch' wine from their cell. I immediately went out and purchased
a quart of Welch's grape juice (drank some to create some space), added
some sugar and a little baking yeast, and then I put a balloon on the
top. Over the course of three weeks I watched the balloon grow, as the
pressure built and on the fourth week my friend and I 'broke open the
bottle' and wolla, we had red wine! Now I can't say that it exactly
tasted awesome, but we sure were feeling goofy when it was all said
and done!
Although there are a few additional steps, the basic fermentation process
remains the same for both white and red wine. The purpose of this article
is to outline the basic equipment, along with the process, as a foundation
of understanding. We have geared the conversation around the most common
quantity for making wine at home, which is around 6 gallons (30 bottles). Additionally, one of the best resources
on
wine making supplies, that I have found, can be
found here!

Equipment & Process
Fermentation Container
The fermentation container is usually a 5 to 8 gallon container that
is used to hold the grape juice in the first step of fermentation. This
container can be made of heavy plastic, stainless steal or glass. It
will need to be covered, but not sealed.
Stage 1 - Fermentation:
At this stage, the juice is combined with sugar and yeast, which is
then allowed to ferment at a controlled temperature (ideal temperature
is dependant upon the type of wine that you want to make). The container
is covered and let to stand for around two weeks. This will give the
yeast time to start to gobble up the sugars in the juice. The byproduct
of this process results in the production of... yup you guessed it...
alcohol!
Hydrometer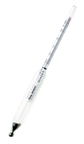
How much alcohol will my wine end up being? Well, the one way
you can figure that out is with a hydrometer. A hydrometer is a sealed
glass tube with a scale built inside that is anywhere from 6 to 12 inches
long and it floats vertically. Basically, alcohol is lighter than
water. The more alcohol a liquid contains, the lower a hydrometer will
sink (it is heavy, alcohol is light). The basicprincipal is to put the
hydrometer into your juice when you very first start the process, and
then you record where on the scale it meets with the liquid. When you
are all done making your wine, you then perform the same process and
record where it sits on the scale. The difference is then noted and
compared to a chart. The chart will then tell you, with a great degree
of accuracy, how much alcohol your wine contains. It's like magic
(not really, it is actually pure physics)!
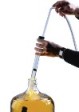 Stage 2 - Siphoning: Stage 2 - Siphoning:
After Stage 1 is complete, it is time to transfer your juice to another
container. The reason is that we want to siphon off the top layer,
leaving the goobers (my technical term) at the bottom of the container.
This process is also known as 'racking'. It is good to perform this
process a few times to insure that all of the heavy sediment is out
of the wine. The wine will now ferment an additional 2-4 weeks (depending
on the type of wine you are making).
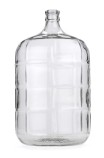
Carboy & Airlock
After you have 'racked' your wine a few times, it is time to move it
to a different container. The second container that you siphon your
juice into is called a Carboy. It is typically made of glass and looks
like a large five gallon glass water bottle. An airlock is then attached
to the top. Remember how I had used a balloon to help with the pressure
on my Welch's grape juice bottle? Well, an airlock basically lets pressure
out, but doesn't let any air in. Oxygen is not good as it effects the
color and taste of your wine. Your carboy will basically be burping
at this point.
Stage 3 - Second Fermentation:
Now that your wine (notice I don't call it juice anymore) is securely
in the carboy with the airlock on, the wine will continue to ferment.
This is actually the yeast eating the remaining sugars, which in turn,
is continuing to convert the sugars to... more alcohol. This will continue
until most of the sugar has been consumed by the yeast, until the yeast
dies (for the most part). Depending on the recipe, there are many other
additives and/or additional steps that you may implore, we are simply
going over the basic framework.Stage 4 - Bottling:
The first step it to pull your hydrometer out, give it a dip and record
the results. Now is when you will be able to determine how much alcohol
has been produced. Then, back to the siphon! This time, rather
than transferring your wine to another large container, you are going
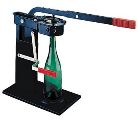
to transfer it to a bottle. You will also us a corker to cork your bottles.
The role of cork in winemaking is to preserve the wine in a state of
reduced air exposure (preventing the introduction of oxygen) and therefore
preserving the flavors.
Sanitization
Provide water and air to just about any environment, and 'stuff' will
grow. In wine making that 'stuff' is almost always funky and will end
with bad results. We want a nice clean environment for our yeast
to grow without any competition. The basic rule is to clean, flush and
sanitize EVERYTHING. Anything that your wine touches should be
sanitized first. This includes your carboy, hydrometer, stir sticks,
siphon hoses, bottles... everything! There is nothing worse than going
through all the expense and work only to have your wine ruined because
of some funky 'stuff' that is growing, and winning in your wine. This
can be accomplished with any assortment of sanitizers that are specifically
designed for wine making.Stage 5 - Enjoy Your Fruits!
After the minimum of one month in the bottle, your wine will be ready
to enjoy. Remember to enjoy your wine with friends and loved ones. It
always tastes better when shared.

Cheers... Eric
|